1 Workspace and User Management

 |
431-955 February 2020 |
2 Introduction
VectorPro™, VectorPro™ MT and VectorPro™ Lite are all registered trademarks of Mecmesin Ltd.
VectorPro is a dedicated software solution used for the programming and acquisition of data from a range of Mecmesin test stands and instruments.
2.1 User Guidance
This user manual section covers the workspace and user management elements only, for further guidance relating to other aspects of VectorPro please refer to one of the documents listed below.
2.1.1 VectorPro™ User Manuals
Click one of the links below to navigate to the applicable user manual.
 |
 |
 |
A detailed guide to designing a test for VectorPro MT compliant test systems. |
|
Covers designing a test for VectorPro Lite compliant test stands and devices |
 |
 |
All Tests Viewer and Results Viewer A guide explaining the functionality of the All Tests Viewer and Results Viewer. |
 |
 |
|
View the latest version of the Mecmesin VectorPro Software License Agreement. |
 |
3 Workspace
When VectorPro is launched, the user will see their personal Workspace. The Workspace is populated by those items for which permission has been granted. Therefore the main administrator’s workspace displays everything that is available. The administrator account can give other users selective permissions, including the right to grant further permissions.
The initial view of VectorPro (at Admin level), before any tests or results have been added looks like this:

By default, the ‘admin’ user has access to every base module, whereas other users need to be given permission before a module appears in their ‘Workspace’.
3.0.1 Maintaining tidy Workspaces
Users other than ‘admin’ need only have items they need in their workspaces. This can be limited for example, to just those tests they use regularly.
This is done through general permissions (see section 'Users and Permissions') and test permissions (see the 'Permissions' section of either the Designing a Test MT Version User Manual or Designing a Test Lite Version User Manual, depending on your test system.
3.1 VectorPro™ Header bar features
Here is the standard header bar in VectorPro with a test system connected.

The icons displayed function as followed:
 |
This icon navigates to the previous screen. If changes have been made to the current screen the save window will appear. |
 |
The ‘USB’ icon, when showing a tick, indicates that a test stand is connected and switched on. When a system is not active (and for RS232 instruments), the tick is replaced by a red cross. The number of connected devices is displayed in the top right-hand circle. Clicking this icon opens the information panel pictured below. |

| 1 | Stand serial number |
|---|---|
| 2 | Firmware version |
| 3 | ELS serial number |
| 4 | ELS capacity |
| 5 | ELS firmware version |
| 6 | Test stand model |
The load displayed on the header bar shows data obtained directly from the system connected. It displays the current load reading so long as the stand is connected to the computer and is switched on.
In this instance, the displacement is the current displacement of the OmniTest-5.0 crosshead relative to the last tared zero. A negative figure indicates displacement below the tared zero, a positive figure is above the tared zero. To zero this reading, tare the position either on the test system or from the test run screen (See section 'Control Bar' located in the Running a Test, Reporting and Exporting User Manual).
3.1.1 MultiTest-dV(u) switching
For MultiTest-dV test stands with dV(u) mode enabled switching functionality from dV to dV(u) is available, by pressing the switch located in the information panel.
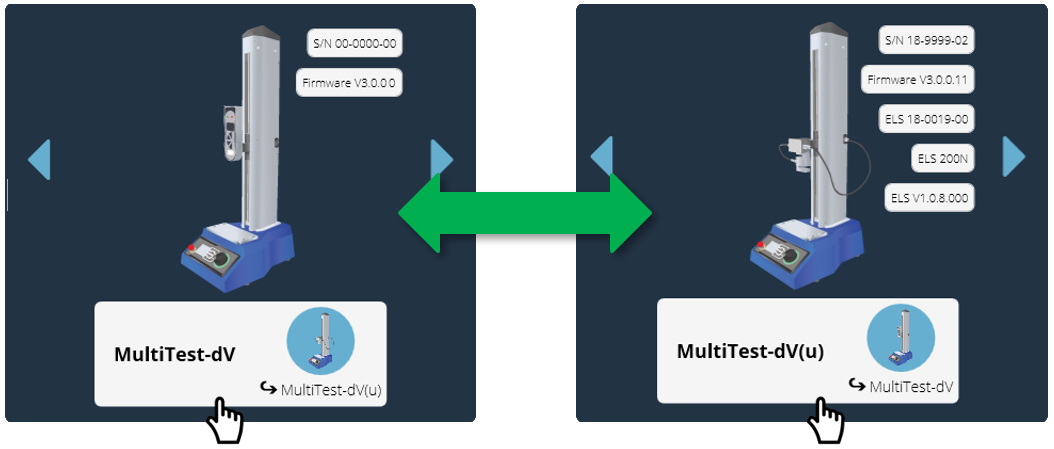
Click the test stand switch button located in the information panel to swap between dV and dV(u) mode.
Please note the following prerequisites are required:
- dV(u) functionality is enabled on the test stand. Test stand must be a MultiTest dV Mk II (supplied from Nov. 2018 onwards).
- A VectorPro Lite key plugged into the computer (supplied when the software was purchased), to run tests using a force gauge with the stand in dV mode.
- A dV(u) key plugged into the computer when switching to dV(u) mode,
The right-hand section of the header bar features the following icons:
 |
The keyboard icon activates the Windows onscreen keyboard (for touchscreen displays) although when operating in Windows 10 ‘tablet mode’ the on-screen keyboard is automatic. The calendar icon shows the current time and day of the month from the PC clock. |
The left-hand icon shows the current username and flag of the display language. Click this icon to select an alternative language.

To improve ease of use in multi-lingual situations each operator can be assigned their preferred languages. This can be done by the user, by clicking on the flag symbol above their name in their ‘Workspace’, as shown in the image above.
|
Click the VectorPro logo, located in the centre of the header bar to display details of the current software version, time/date, and database version and save location. This screen is pictured below: |
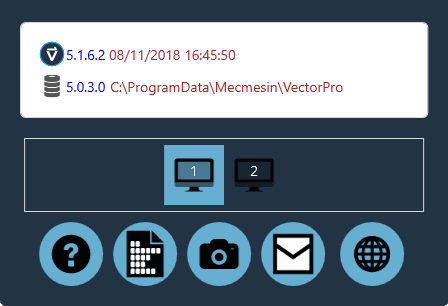
The icons shown function as followed:
- Click the question mark to access the user manual. Please note that a PDF reader must be installed on the computer.
- Click the document icon to view the software license agreement.
- Click the camera to take a screenshot. A .png image is saved to 'C:\ProgramData\Mecmesin\VectorPro\images'.
- Click the envelope to send full system information as a table in an email.
- Click the web symbol to launch the Mecmesin website homepage. Internet connection is required.
- Click on the monitor symbols to change which screen VectorPro is displayed on.
Other icons are displayed in the header bar when running tests and viewing results, and confirmatory messages in orange boxes. See section 'Test Stand Zero Control Panel' located in the Running a Test, Reporting and Exporting User Manual for more details.
4 Users and Permissions
Click on the ‘Permissions’ tile to create new users, groups and to edit permissions for features within VectorPro. Within the main ‘Permissions’ screen, there are two tabs. These are ‘Users/Groups’ and ‘Permissions’ (Pictured in section 'Permissions').
4.1 Users
A user is a single VectorPro login. Users can have individual permissions applied to them within the ‘Permissions’ tab. They may also have ‘Permissions’ tab of individual test files (accessed when either creating or editing a test). Users can be added to permissions groups.
4.2 Admin Account
Access to the Admin account functions cannot be limited, so it is recommended for the security of the database, that the default password of the Admin account be changed and stored in a secure location.
4.3 Groups
A Group is a collective of one or more user. Groups can be used to apply permissions to several users at the same time, for example, if there are four users who all need permissions to run tests but not edit them, rather than editing permissions for each individual, a group can be created. The group permissions can then be defined. See section 'Creating and Editing Users and Groups' for more details.
This group can be named to represent the type of users or the function the group performs. For example, the next page shows an example of a night and a day shift group. Any permissions applied to this group apply to all users within the group.
4.4 Creating and Editing Users and Groups
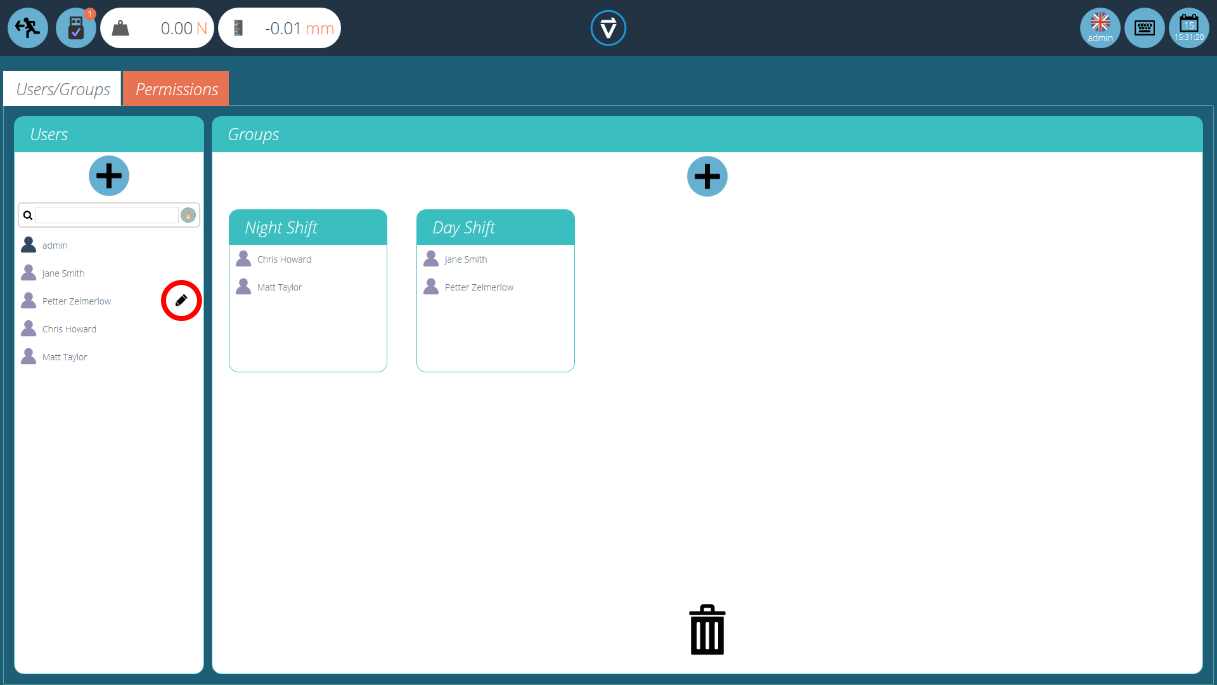
- To add a new user with a password, click the ‘+’ button located in the ‘Users’ section on the left –hand side of the screen and define a username and login for this account.
- To add a new group, click the ‘+’ button located in the ‘Groups’ section in the centre of the screen and define a name for the group. In the previous image, the company has a night and day shift groups.
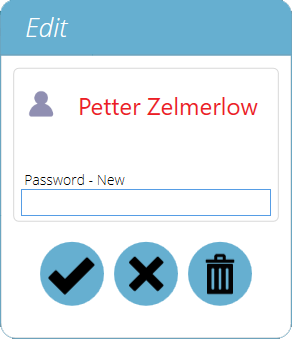
- To edit a user password, find the name and click the black pencil (circled red in the image at the top of the page). To edit a group name, find the name and click the black pencil.
- To delete a user or group, select ‘edit’ and click the trash icon in the edit dialogue box.
4.5 Configuring Permissions
- To configure the permissions for an individual user or group, navigate to the ‘Permissions’ tab. Here, using drag-and-drop control users and groups can be placed into predefined settings cards located in the centre of the screen.
- When a user or group is placed in one of these settings cards they are granted the relevant permission. The image below shows a typical example of the permissions screen.
- In this example the user groups ‘Day Shift’ and ‘Night Shift’ have been placed in ‘All Tests’, ‘Attributes’, ‘Language Mapping’ and ‘Test Results’ this means these aspects of VectorPro are visible to these groups.
- In this scenario, as ‘Chris Howard’ is the supervisor for the night shift and ‘Jane Smith’ is the supervisor for the day shift. Therefore they have been given permissions to all aspects of VectorPro.

4.6 Filtering Users and Permissions
Within the ‘Permissions’ tab, there are options to filter both the users and groups visible, and the permission settings cards. Users and groups can be filtered using the search bar located on the left-hand side of the screen (pictured below).
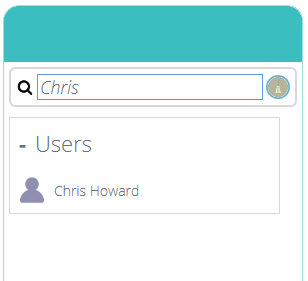
To filter results simply type the name of the user or group required. Use the ‘broom’ icon to clear the results.
Within the ‘Permissions’ tab, the user can also filter the settings cards displayed. To filter the permission settings cards on the screen select one of the four tick boxes located at the top of the ‘Permissions’ window on the right-hand side, as shown in the image below.
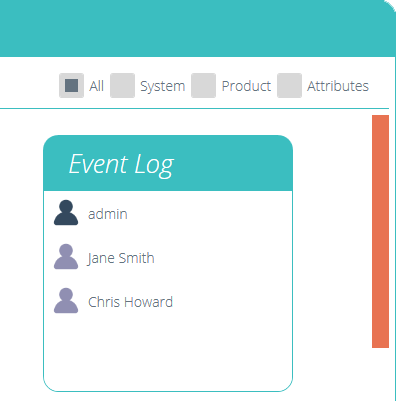
Select System, Product and Attributes. System displays workflow settings, with permissions such as the ability to delete tests being shown. Product displays test systems and instruments such as an OmniTest-5.0. Attributes display permissions only for the available attributes. These are created when new attributes are added to tests.
4.7 Attributes Permission screen interface
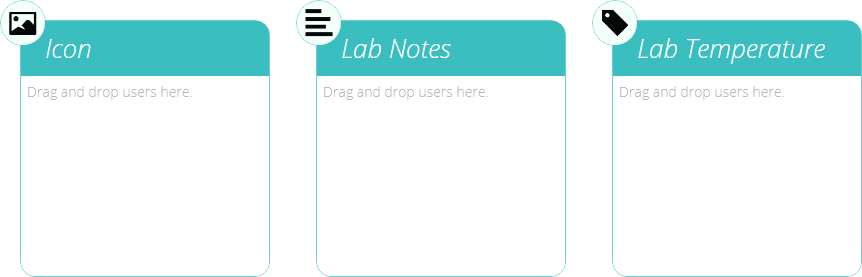
The attribute cards within the ‘Permissions’ screen can be quickly identified by looking for the icon in the top left of the tile. Use the filter to select only the attributes required to be displayed. For more information see section 'Filtering Users and Permissions'.
For example, below there are three attributes. An image, a note and a label, this can be seen by looking at the Icon in the top left-hand corner.
4.8 Test Permissions
Every test routine that is created and saved offers further test-specific permissions to be granted. A test can be added to a user’s ‘Workspace’ with the option to grant permission to edit and save, upload, execute, view and print reports from this test. See the 'Permissions' section of either the Designing a Test MT Version User Manual or Designing a Test Lite Version User Manual, depending on your test system for more information.
5 Language Mapping

All text phrases displayed within VectorPro are held in a user-editable dictionary and can be edited:

To edit the desired language select the language to examine and where necessary, edit entries as required.
Ensure changes are saved before closing. These changes are now visible within the software in place of the original phrase.
6 Event Log

To access the event log simply click on the ‘Events’ icon located in the main workspace, provided the currently active user has sufficient permissions to view the event log.
The event log is used to track user activity. Listed here are actions have been carried out, by which user and when this event happened. The event log screen consists of these sections:

- Event log (Green Highlight): this section shows a log of events within VectorPro. Here all actions are recorded by all users. This enables complete transparency when tracking user activity within the system.
- Search filters (Red Highlight): these filters are used to display only logs relating to those required. See the next section for definitions of each filter.
- Page control (Dark Blue Highlight): this section displays the total number of event log pages available to view. The number entry field below can be used to ‘jump’ to a specific page by typing the number and pressing the arrow button to navigate to the page.
- Event log controls (Orange Highlight): the left ‘trash’ icon is used to clear filters while the right icon is used to load archived event logs.
- Additional Info (Purple Highlight): this displayed any additional information such as text entered by the user.
- Event Log – Export / Email / Print (Light Blue Highlight): these controls allow export, sending via email and exporting of the event log data.
6.1 Search filter definitions
Filters located at the top of the window allow a finer search of the event viewer information. The function of these filters is detailed below.

| 1 | Filter by a specific date or a range between two dates |
|---|---|
| 2 | Filter by specific users or user group |
| 3 | Filter by 'View'. This is the screen at which the action occurred |
| 4 | Filter by action taken by the user |
| 5 | Filter by a target, this is the element that was affected by the action |
6.1.1 Filter by a date range

To filter results to display information only between a specific date range click the filter by date icon and click the ‘Range’ toggle switch highlighted in red. To clear any date filters click the ‘trash’ icon located in the top-left of the window. To confirm the selection, click the ‘Tick’ icon and to cancel it click the ‘Cross’ icon.
6.1.2 Filter by User

Results can be filtered to indicate which user was responsible for the event. It is also possible to select multiple users by clicking on their icon located in the left-hand ‘User’ section. Select a group by clicking on a group in the right-hand plane. To clear the filter click the ‘trash’ icon located in the top-left of the window. Click the ‘Tick’ icon to confirm the selection and the ‘Cross’ to cancel. Please note, selection of a group and a user at the same time, is not possible.
6.1.3 Filter by view, action or target

The three windows for filtering by view, action and target follow the same design. Simply select the elements required to filter and click the ‘tick’ icon. The ‘Cross’ cancels the selection and the ‘trash’ icon is used to remove any filters.
6.2 Event Log archiving
After a period of 1 year has passed from the creation of the event log it will be archived, upon entering the software the user will be presented with the following window.

To successfully archive the event log approximately 10GB of minimum space is required, although in practice a much smaller amount is used, VectorPro should not be used if there is less than this figure free on the hard drive. If there is not sufficient space available, the following error will be presented.

To successfully archive the event log, the user will be required to clear files on the hard drive until there is sufficient space free to complete the archiving process.
The Archive location (once an acrhive has taken please) is within the current Database being used, located within the 'DBS' folder.
6.3 Accessing archived Event Logs
 |
To access old archives simply click the load event log icon, pictured left. This screen offers views and loading of, previous archived event logs. VectorPro is able to store numerous event log archives ensuring historic data is always to hand. |

The example screen above shows archived event logs for 4 years ranging from 2014-2017. To load a previous event log simply click on the desired archive and click the ‘Tick’ icon. To unload an archived event log from the current view click the ‘trash’ icon, the currently active event log will then be loaded in its place. To close the window click the ‘Cross’ icon.
7 Email Features in VectorPro™
7.1 Email Overview
VectorPro provides simple email support for sending information such as:
- VectorPro software and database versions
- Results data
- Images of test traces
- SDC schemes and settings
- Event log details
7.2 Using the Email Function
The email icon is common throughout all VectorPro screens and functions.

When the icon is pressed, the software will display a new window. The window shows the email address entry field and the attachment name and file extension that is ready to be sent, as shown below. Pressing the ‘send’ button will attempt to deliver the email.

If the email is sent correctly, the user will be notified (as shown in the image below) and will need to acknowledge the screen prompt to clear it.

If an internet connection is not available, or if this function is blocked by IT policy, then the email attempt will report a failure, as shown below:

The ‘sender’ email address that VectorPro uses is: no-reply@vectorpro.cloud
If the format of the email address is not as required, the user will be warned (as shown below):

8 Further Information
For more information relating to VectorPro, please return to the User Guidance section of this user manual and continue to the next applicable user manual.